Content Creation
My Entire Filming Setup for Ads & YouTube Videos (With Links)
Why I Can Produce So Much Content Consistently
The reason I'm able to put out a high volume of YouTube videos and ads isn't some secret productivity hack — it's that my filming setup is always ready to go. The camera stays where it is. The lighting stays where it is. The mic stays where it is. I never have to screw around with tech before I start recording.
If I need to film, I just turn everything on and go.
One of the biggest mistakes people make when they want to start filming ads or content is they make it a whole project just to get set up. They're fumbling with a phone tripod, an external mic, different apps — it becomes a barrier. My entire philosophy is to make nothing feel like a giant project. When filming is frictionless, you actually do it.
The Camera: Sony ZV-E10 + Elgato Teleprompter
The camera I use is the Sony ZV-E10. On top of it, I have an Elgato Teleprompter that slides onto a ring around the lens. A wire runs from the teleprompter to a small docking station on my desk.
For the camera connection, I have a micro HDMI cable coming out of the Sony ZV-E10 into a regular HDMI, which plugs into an Elgato CamLink 4K. The CamLink plugs into a hub, and that hub connects to my MacBook. That's how the camera feeds into my computer as a clean video source.
Lighting: The Most Important Part Nobody Gets Right
Here's what you need to understand about lighting: it has to be brighter in front of you than behind you. My background has a lot of natural light, which is actually a problem. If the background is brighter than your face, you'll look dark and washed out on camera.
To fix this, I use a large lightbox mounted on a light stand positioned in front of me. This is my primary key light, and it makes a massive difference — flipping it on goes from looking flat and dark to looking clean and professional.
I also have a second smaller light for additional fill lighting, and sometimes I bring a third light overhead. The combination of these keeps my face evenly lit regardless of what's happening with the background.
Microphone: Shure Mic on a Rode Stand
For audio, I use a Shure microphone mounted on a Rode desk stand that clamps directly to my desk. The cable runs along the desk and plugs into the same hub as everything else. Clean, out of the way, and always ready.
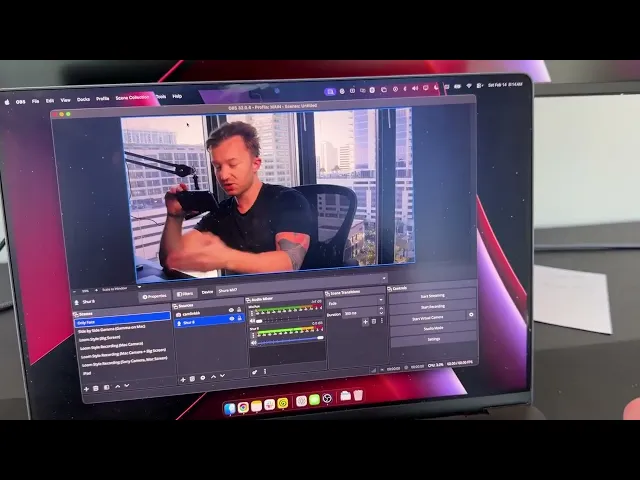
OBS: How I Record Everything
I use OBS (free software) to record all my videos. Here's how my setup works inside OBS:
Scenes and Sources
OBS uses scenes and sources. My main scene is a simple face-cam shot — the source is the CamLink 4K. I also have a side-by-side scene where I'm on the left and my Mac display is on the right. This is perfect for when I want to walk through a document or screen while talking to camera — like a built-in Loom-style recording.
You can resize and crop sources, switch between scenes mid-recording, and add sources on the fly. It's flexible once you learn it.
Critical Settings: Record to MKV, Not MP4
This is probably the most important OBS tip I can give you: do not record to MP4 by default.
MP4 files can get corrupted if something goes wrong mid-recording. You film for 30 minutes and the file is just gone. It's brutal.
Instead, I record to MKV files and have OBS set to auto-remux them into MP4 when I stop recording. So the workflow is: record → stop → OBS automatically converts the MKV to a clean MP4. You get the reliability of MKV with the usability of MP4.
Bitrate and Encoder Settings
Under Settings → Output → Recording, I use the Apple VT H.264 Hardware Encoder. My bitrate is set to 12,000 kbps on my M4 MacBook Pro. If you set it too high, you'll get an "encoder overloaded" warning and the file will likely corrupt. Dial it down until recording is stable. Higher bitrate means better picture quality but larger file sizes — find the balance that works for your machine.
Bonus: The Under-Desk Walking Treadmill
This isn't filming gear, but it's one of the best purchases I've ever made — a walking treadmill that slides under my standing desk. I average around 17,000 steps a day now. If you work at a desk all day and find yourself not moving enough, seriously consider it.
My desk also has memory presets so I can switch between sitting and standing height instantly. Eventually I want to figure out how to keep the camera aligned when I adjust the desk height so I can film while walking — but that's a future problem.
Get the Full Gear List
I've put together a full Google Doc with direct affiliate links to every single piece of gear in this setup, plus detailed instructions on how everything connects. You can even download the doc and feed it into an AI to get a step-by-step setup guide built around your specific situation.
Link is in the description — go check it out.


